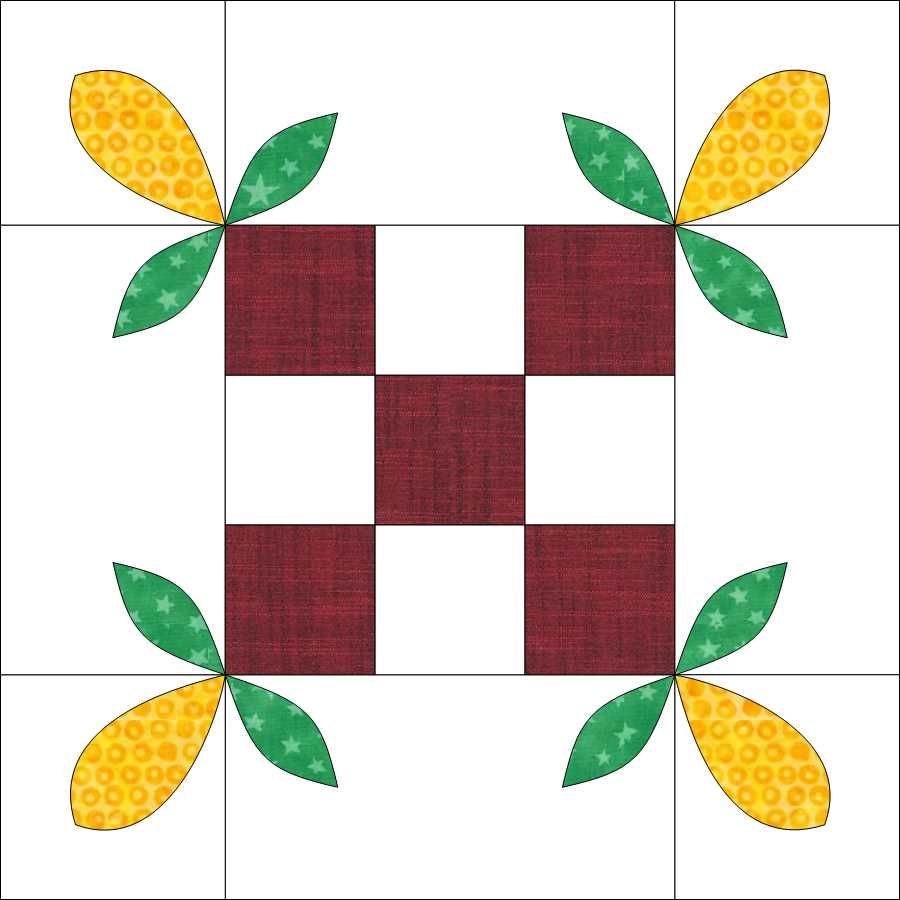
Wow this was a fun block. But also horroring. The Honey Bee block has a pieced nine patch center and applique corners. I wanted to turn my applique edges. However to my horror, my hands no longer allow me to manage such small tasks. This was a shock. But I broke down and finished the block using raw edge. However in the templates I have also included 1/4 borders so anyone can choose. Raw or Turned edge.
Cutting
4 – 3 1/2 x 3 1/2 square background patches
4 – 3 1/2 x 6 1/2″ rectangle Background
9 – 2 1/2 x 2 1/2 square 5 patches accent fabric and 4 patches background fabric
Note: will need some accent scrape to use for applique.
here are the cut squares for my nine patch. Since I am using a fat quarter bundle from Anthology Batiks, called Loveable. I choose to accent colors. I cut 4 squares my main red and then 1 square a orange accent for the center block.
Using standard 1/4″ seam allowance (#97D foot for my Bernina 590). make your nine patch any method you choose. I actually used cut squares with Seam Align Glue for accuracy. however you may choose any method .
Adding Border
Once the nine patch is complete stitch a 3 1/2 x 6 1/2 unit on two opposite sides. And sew a 3 1/2 x 3 1/2 square to the 2 remaing 3 1/2 x 6 1/2 inch strips using your standard 1/4 inch seam allowance.
Now stitch using a 1/4 inch seam allowance the 12 1/2 x 3 1/2 inch strips to the other two sides of your nine patch block. Being careful to match your seams. I pressed my seams out.
Now using the templates provided. cut your applique pieces using scraps within your color range or fabric. (note: you need 2 D pieces. These pieces are angled to fit currently.
adhere your applique pieces to each corner using the layout on the template sheet. I used Elmer’s Glue Stick for the process. After all pieces are placed in the proper position, use a warm iron to secure the glue.
Using a 2mm x 2mm blanket stitch I secured my applique pieces. Proceed slowly to have smooth accurate curvers. (I used Amann Mettler Saba 150wt corespun polyester thread color 3000 (Candlewick), which is nearly invisible) Note I removed my paper templates as I prepared to stitch the pieces down.
After a light pressing, success your block is complete.
I really like this block. Was fun to make. Somewhat unique. Think it would make a beautiful quilt.
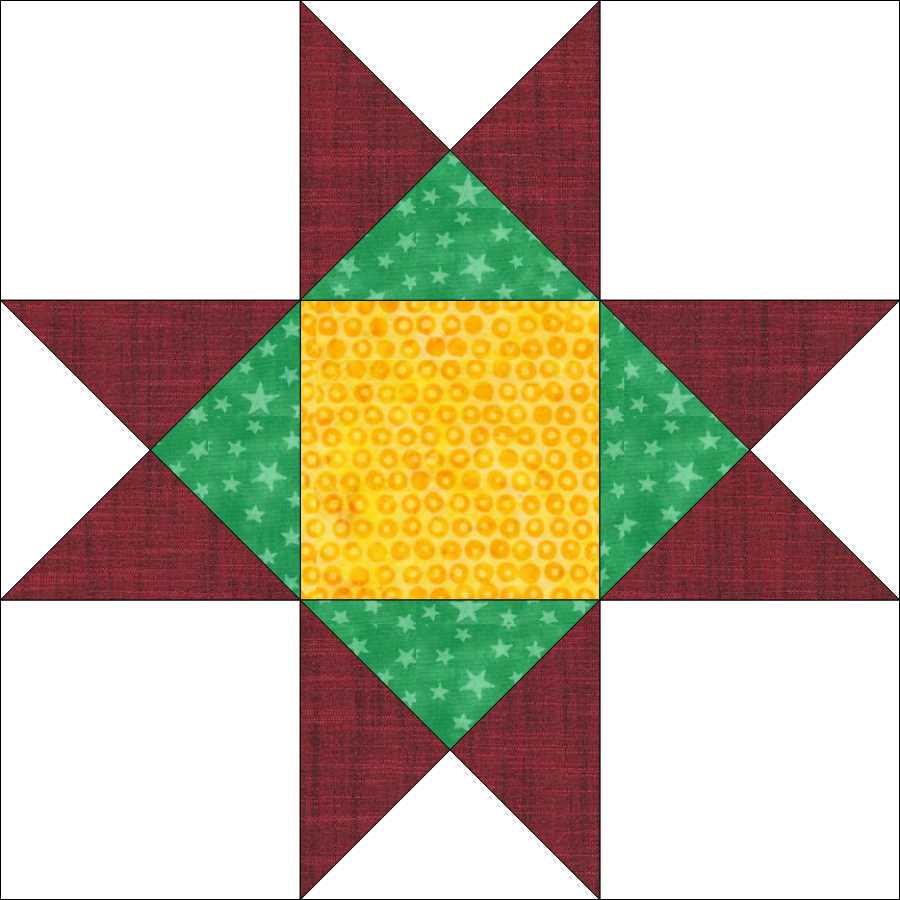
The Ohio Star is a great grid based star block. it is a simple Nine Patch, made with Quarter Square Triangles (QSTs) and Solid Squares
This block was made with a three (3) color quarter square triangle unit. Using the Anthology Batik Love Fat Quarter Bundle and Maywood Studio Dragonfly White fabric. I choose to add a yellow highlight triangle to the quarter square triangles. I like how this block turned out. The yellow is from McKower Solids.
Fabric Requrements
4 – 4 1/2″ squares Backgroud fabric
1 – 4 1/2″ square Accent fabric
2 – 6″ squares Accent fabric
1 – 6″ square Background fabric
1 – 6″ square highlight fabric (can also be Background fabric for tradional QST unit)
Please note: I cut my blocks bigger and then trim down. The cutting instructions are actual size requrements.
Making Quarter Square Triangles (QSTs)
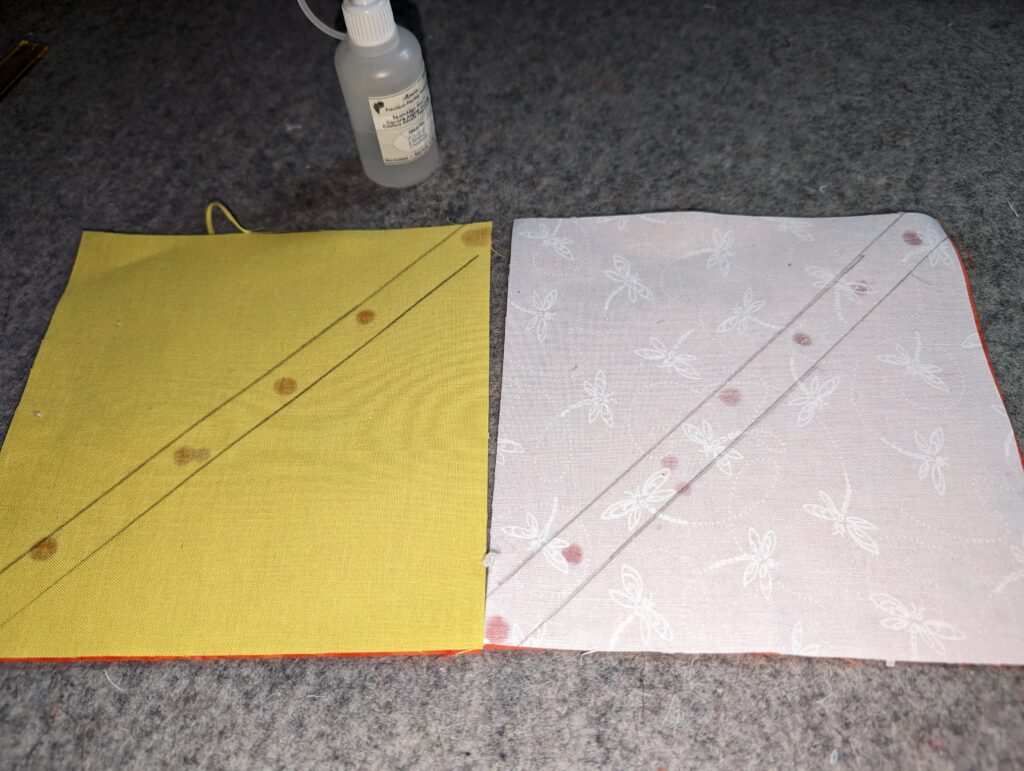
First using background and highlight fabric and mark for half square triangles. Using your prefered method of securing your 6″ squares. Accent and Background/Highlight fabric right sides together. I used Seam Align Glue from Acorn Precision Piecing. I used the Studio 180 Magic Wand to mark my stitching lines
Stitch 1/4″ from the center dianglely corner to corner. I used a 1.8mm straight stitch. Note I marked my acutal stitching line. You can also mark one line down the middle using your 1/4″ foot. But you can use what ever HST or QST method you prefer. Need is 4 – 4 1/2″ QST units for this project
Now that your 2 square units are stitched. Cut each unit into half down the middle between your two stitch lines. This will give you a total of 4 HST units. in my case 2 units with background and 2 units with highlight fabric.
Now press your HST units open. I pressed to the Accent fabric.
Now mark your HST units with Background fabric again. just like you did with your HSTs in the beginning. However going to mark dianglely from corn to corner opposite your seam. As show see the lines going from accent to background fabric corner. Again marking my stitching lines with the Studio 180 Magic Wand
Using your prefered securing method, I used Seam Align Glue. Secure from corner to corner between your two new stitch lines.
Next place the other 2 HST units opposite. Background/Hightlight fabric over Accent fabric. As shown in the photo above. Make sure your HST seams properly nest or match.
Stitch 1/4″ inch again from the center corner to corner. As you can see I marked my actual stitching lines again. Again using a 1.8 mm straight stitch wth Amann Mettler Saba
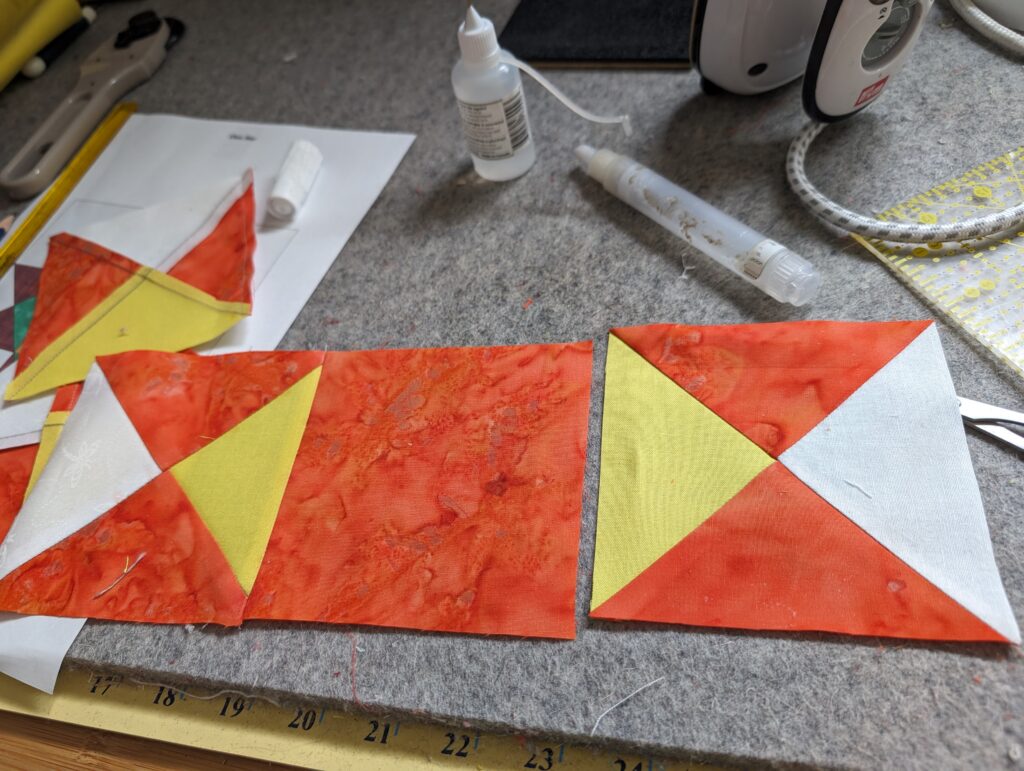
Repeat cutting each unit in half between your two (2) stitch lines. Giving you a Total of four (4) QST units.
Press your units open. Notice I pressed to the background fabric side. Doesn’t matter just be consistent. Using the Pressing Solution from Acorn Precision Piecing, making sure the seams are totally flat. little to no bulk. Now you have a total of four (4) beautiful QST units. Note I make my QSTs larger than required. the reason I do this I am sometimes a heavy pressor and can distort the bias seams. This results in wonky or skewed QSTs.
Trim each unit down to proper size. This block requires 4 1/2″ sub blocks I used the 4 1/2 (4.5)” square template to trim my QSTs to proper size. By matching the corner of the template with each of the seam lines in your QST unit. This insures your block is properly centered in the middle of the template. Trim each side.
It is acceptable to use your preferred method. Many like the Studio 180 Tuckerizing method using the Tucker Trimmer But what ever method it is your choice!
With four (4) perfectly trimmed QST units. Noting the perfect points in the center, this is done by carefully matching seams. I personally prefer my Martelli Templates. They offer easy fast and accurate trimming
Assembling 9 Patch (Ohio Star)
Assembly should be pretty simple for most quilters. Even beginners. This biggest issue is to make sure the highlight fabric faces the center accent fabric block.
But this is simple steps.
match a background square and your QST unit with highlight fabric facing down. and a second background square with another QST unit with highlight fabric facing up. (the direction doesn’t matter unless you are using a directional background fabric).
now Accent square and QST unit with hight fabric facing your seam line.
stitch all three units with a 1/4″ seam allowance using your favorite 1/4″ pieicng foot. I used the Bernina #97D Piecing Foot without guide on my Bernina B590 with again a 1,8 mm straight stitch.
Press seams your seams. I chose to press to the background fabric.
add second backgroud square on opposite side of each of your 2 units. And the second QST unit to the opposite side of your center Accent square again becareful to make sure your highlight fabric faces your center square unit.
Aagain stitch each of the 3 units with your 1/4″ seam allowance.
Press seams again I chose to press to my solid square unit.
now assemble the three units care to match all seam intersections. and press the seams away from the center strip.
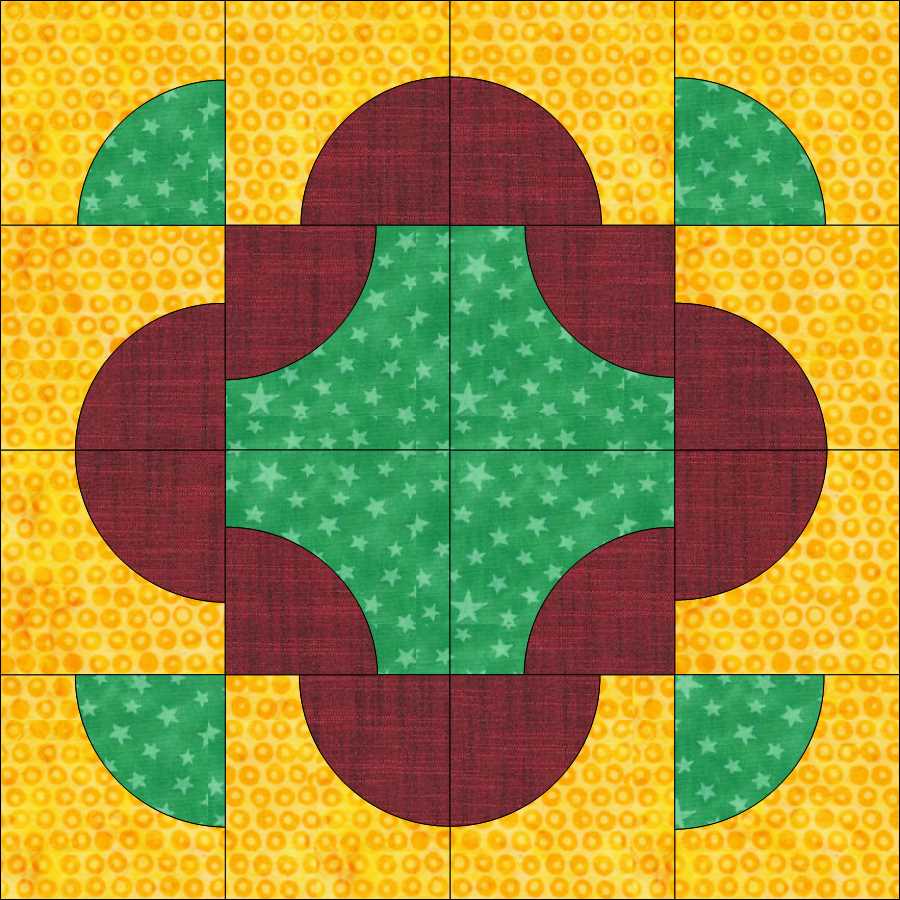
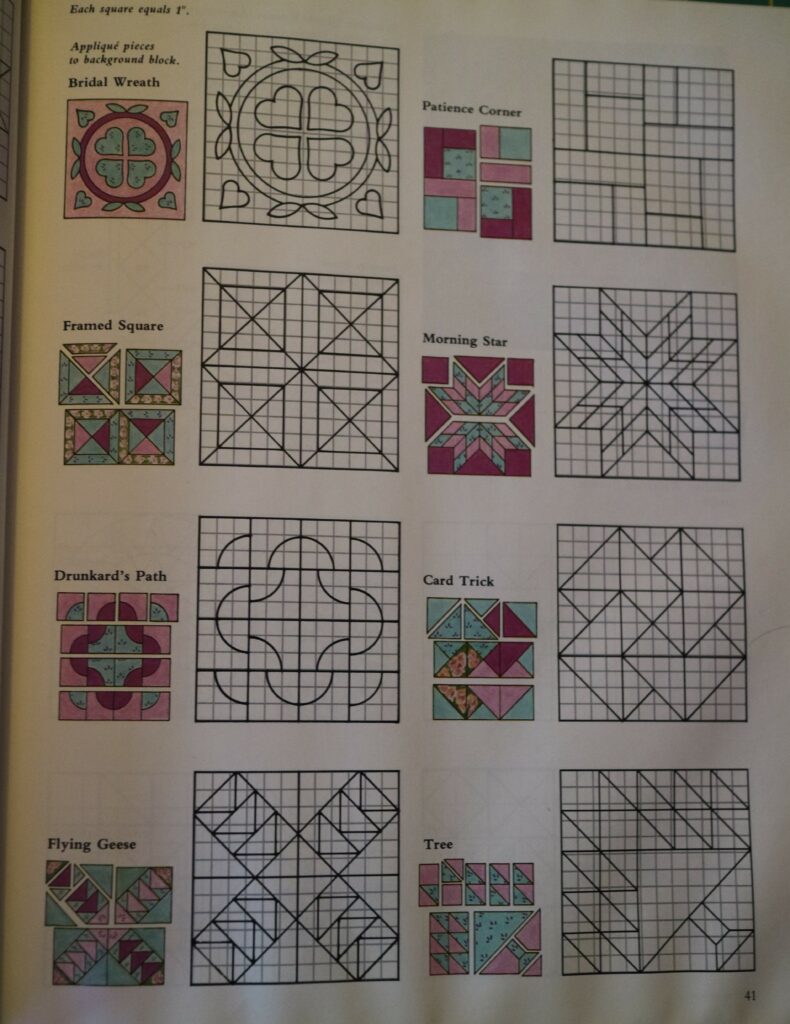
The Drunkards Path block is a tradtional block. However, it requres curved piecing. There are many videos and posts online how to make the tradtional Drunkards Path block. So I am not going to spend time elaborating. However I am attaching the templates to make the 16 blocks required for Block 3. Each block is 3″ inch finished.
1 circle is to use the corner (center) fabic and 3 circles are the darker color for contrast. Place water soluble mesh stablizer on front (right side) of fabric and template on top of the mesh. Stitch using a straight stitch (used 1.8mm stitch )
Cut your circles out with approximately 1./4″ inch allowance. Doesn’t have to be perfect.
Remove paper template, should be easy when using a 1.8mm stitch.
Clip a hole in the center of the mesh and turn your circles right side out. and you might want to press with a lightly warm iron (not a hot iron my melt or shrink your mesh) and do no use steam. Moisture with dissove the mesh.
Now we must mark your circles with an X with the point in the center. Also at the same time mark your 7″ inch squares from corner to corner
Using your prefered water soluble glue (for this project Elmer’s Purple Glue stick was used) glue your circles to the center of each of your squares using the lines to get everything perfect. use a warm iron to set your glue.
Once all the pieces are complete and stable Using a 2mm x 2mm blanket stitch (Amann Mettler Saba 150 wt thread) stitch your circles down. Work slowly so that the stitching is smooth as possible. Moving the needle to the far left and the #20D Bernina Open Toe foot was perfect for this task. You can use your favorite applique foot.
With the applique securly stitched. it is time to cut your 7″inch squares into 3 1/2″ quarters. There should be 4 blocks per 7″ inch block making a total of 16 – 3 1/2″ inch drunkards path block.
Layout your design. Careful to get all the curvers and points to match. You can see I used the Pink Batiks for my center and corner accents and white for the backgroud.
Piecing the block together is a simple matter of working with four patch block. Stitch two blocks at a time. the 4×4 grid or 16 patch is actual simply 4 x four patch blocks assembled into a pattern.
Caution when pressing seams. The center area of the blocks can become a little think and difficult to work with, Take your time and press your seams flat. I used Acorn Precision Piecing Pressing Solution.
Now your block is finished. Success The Drunkards Path is complete. With that over with, a huge sigh of relief on my part. I have done several challenges using drunkards path, and I can honestly say this is not a favorite. But it is complete.? And acceptable for me. Even though not perfect.
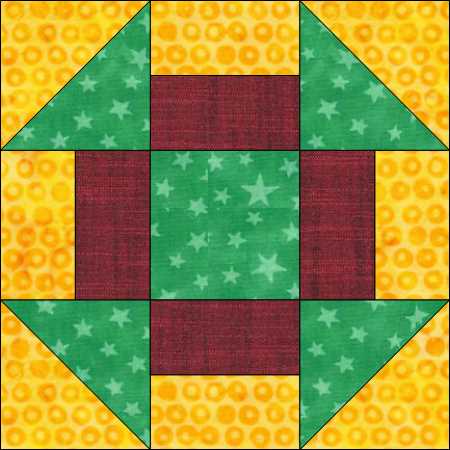
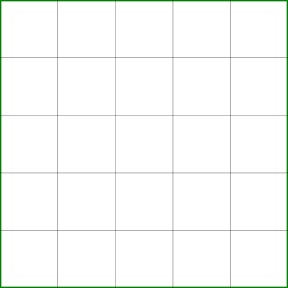
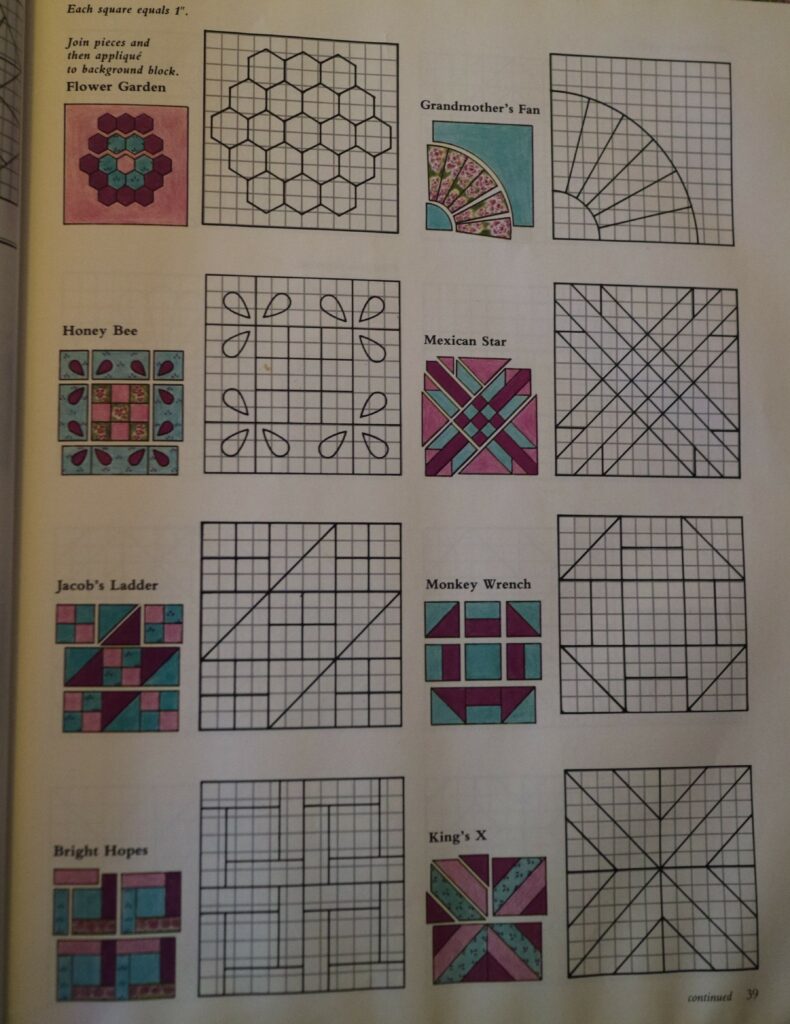
Monkey Wrench is a simple Nine (9) Patch Pieced Block. The Finished size for all the blocks in the Billie’s Smapler is 12×12″ inches.
Above is the grid layout for the Monkey Wrench block. Since we are working to create a 12×12″ inch block. Each sub block of this simple nine patch should be a finished 4×4″ inch sub block
Cutting Instructions
1 x 4 1/2 x 4 1/2″ inch Square Dark Fabric
4 x 2 1/2 x 4 1/2″ inch Rectagle Medium Fabric
4 x 2 1/2×4 1/2″ inch Rectable Light Fabric
2 x 4 7/8″ inch Square Dark or Medium Fabric
2 x 4 7/8″ inch Square Light Fabric
Note: I cut my squares for HSTs larger than required and cut down. I cut mine a 5 1/2″ inches and trim
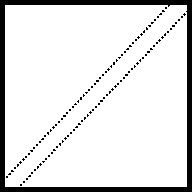
Making Half Square Triangles (HSTs)
First mark the wrong side (or Back) of your light HST fabric with stitch lines. I mark my actual seam lines using a Studio 180 Magic wand. However many choose to mark a line from corner to corner.
Placing your medium/dark and light HST fabric right sides together. using warm iron (no steam) press to dry the glue, holding the two pieces together securely
Now stitch on your stitiching lines (or 1/4″ from center line) on each side of your HST square.
Note I choose to use a 1.8mm stitch length. Using Amann Mettler Saba 180wt corespun polyester thread. I use this super thin tread with smaller stitch length because there is no thread bulk in my seams. Also I piece using a Organ HLx5 75/11
Note: I use Organ HLx5 needles because they are hardened, with a anti heat and anti glue coatings. This makes these needles last forever, I can easily get up to 6 months of regular piecing with each of the needles. Also, please take my advice these needles are not for the beginner sewist/quilter. The reason is because of the coatings and hardening, when you break one, it can severely knock your machine out of alignment. I have had to take my machine to the dealer/tech a couple times becuase I broke a needle and it moved the needle position or effected the machine timing.
Futhermore, Schmetz also makes an HLx5 needle. The Schemtz HLx5 version has a ball or dull point, where the Orgran version has a very sharp point which is what I prefer?
Cut your squares corner to corner between your two (2) seams. This will give you 4 HSTs. Press your triangles open to the darker fabric.
Using 5 1/2″ squares, it is needed to trim your HST squares down to 4 1/2″. I use my Martelli Square Template 4.5″. Align the corner points of template with your seam line. Trim using the edge of the template. This gives you a perfect 4 1/2″ square.
The HSTs step is complete?
Stripe Center Blocks
Taking your 4 Dark and Medium 2 1/2×4 1/2″ rectagles. Stitch each set together on the long side. Again I used Saba 180wt thread with 1.8mm stitch length. Press your 4 squares open to the dark.
Assembling Block
it is time to assemble the block. Being a simple nine patch. there are many ways to assemble the block. I choose to assemble 3 rows of 3 squares .
You need to lay your block out and decide how you want to assemble. As displayed you will notice I wanted my lighter strip facing the the darker center. And wanting the darker side of my HSTs to face the matching darker center. However the layout is up to you!
A moment of caution please take your time assembling your block. As you will noticed I turned one of the stripe blocks upside down. Meaning I had to spend a few moments with Jack the Ripper. And because if use smaller stitches, it takes a little longer and significant more caution when ripping a seam. So take your time and get your sub blocks placed and turned correctly before assembling.
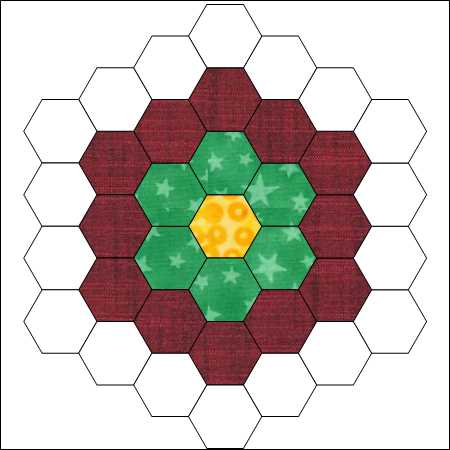
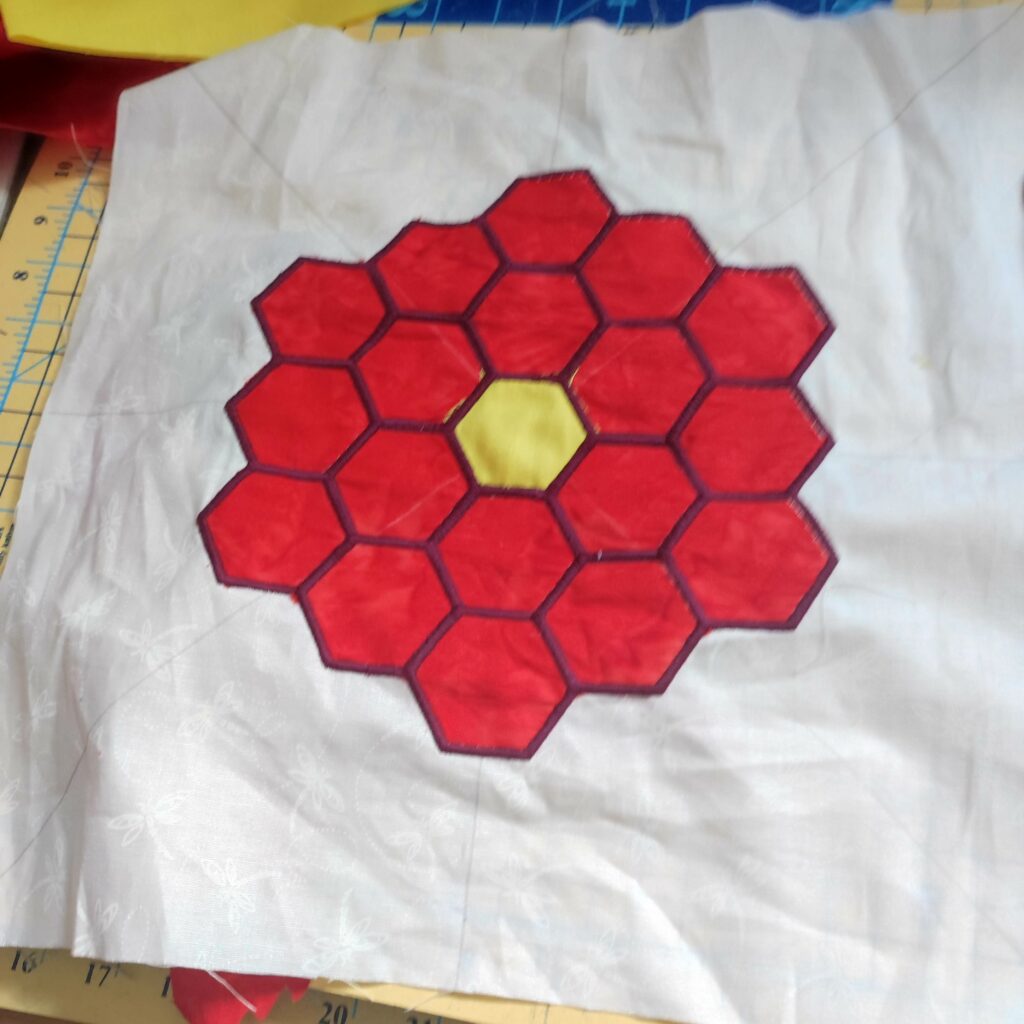
Grandma’s Flower Garden Block is old basic Hexagon design. This block can be Pieced, English Paper Pieced or Appliqued. The applique method depends on your personal style. You can use Raw Edge, Turned Edge, or like I, Satin Stitch.
But a note about the satin stitches. I will not use this method again. It took me three (3) days of stitching to finish this simple block. One (1) day cutting hexagons and stitching each down on my 12 1/2 x 12 1/2 backgroud block. And two (2) days to acutually stitch all the satin stitches. However, I never do myself any favors. I manually tapered each point on every hexagon. What fun. My Bernina B590 does not offer tapering. However my Pfaff Creative Sensation does have this feature, which would have made my life so much easier. So suggested do not try this unless your machine has a tapering feature. Just for Sanity!
Working with Hexagons
Talk about teaching a old dog new tricks. I learned something new working with the hexagons in this project.
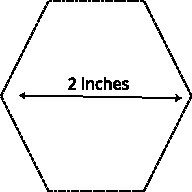
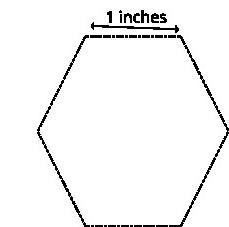
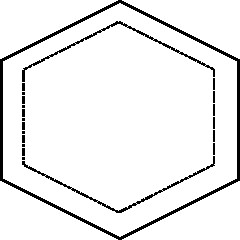
I was always taught that a Hexagon is measured by using its diameter. Point to point. So in this block you would use 2 inch finsihed hexagons. However in quilting a hexagon is measured by one side. Thus getting a 1 inch finished hexagon. Always something new.
Piecing Hexagons
If you choose to piece the hexagons, then you would need to cut 19 – 1 1/2″ inch hexagons for this block. It must be noted that when piecing hexagons you do not want to stitch from edge to edge. The reason is the stitch crossing all the different corners causes little bumps in your block. Therefore, you always piece a hexagon starting 1/4″ from the edge and stopping 1/4″ before the ending edge. This why so many hand piece. However, with many modern machines you can create a program stitch that is 1″ long or 25mm to 25.5mm long swam (1″ equals 25.4mm). You can even program locking stitches. On my Bernina this procedure is called Stitch Recorder, On my Pfaff called Stitch Program My old Janome MC 12000 would automaticlly ask if I wanted to repeat the stitch sequence that was just completed, this popup showed when using the piecing function in the T-shirt menu.
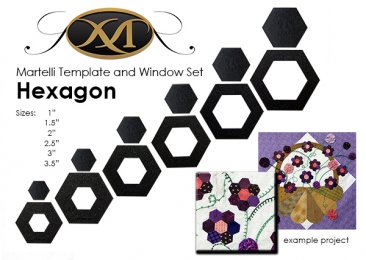
Notice the inside stitching line in the imagine above. To make this process easier, I would mark my seam lines. Using Martellie Hexagon Templates use the 1 1/2″ hexagon template to cut the 19 hexagons. Then using the 1″ hexagon placing in the center of the cut 1 1/2″ hexagon piece, using pencil or other marking tool, mark the seam allowance, using the edge of the 1″ hexagon template. You can also use a Studio 180 Magic Wand or any other tool that helps you to mark a 1/4″ seam allowance.
Satin Stitch Applique
I choose to use Satin Stitch applique. Using the same method with Turned or Raw Edge, minus satin stitching around each seam.
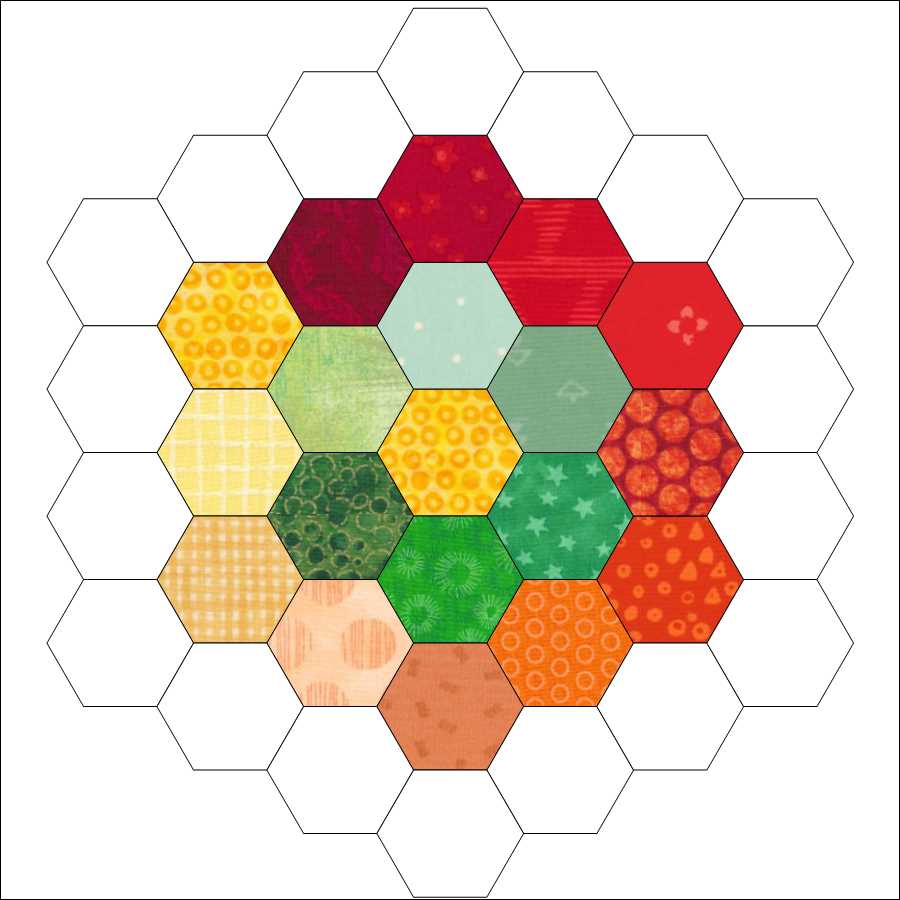
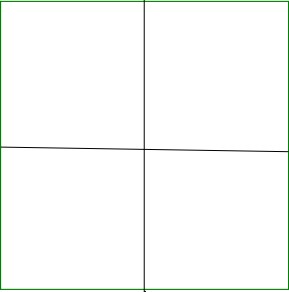
First cutting 19 – 1″ inch hexagons, I used Martelli Heagon Templates. Also need to cut 12 1/2 x 12 1/2 inch background square. Locate the center of the background square. Note the pencil lines from corner to corner and middle to middle on the image below. Gluing your center hexagon to the center of the square Then glue each round of hexigons. for a total of two (2) rounds. I used Acorn Precision Piecing Seam Align Glue, however, it is okay to use Elmer’s or any other Water Soluble glue for this step.
After the glue is set, either by drying or pressing with a warm iron. Using a small zigzag stitch, I used 3mm wide by 2mm lengh. Using your stitch in the ditch (edge stitch) foot (#10 Bernina Foot), stitch around all the edges of your hexagons. The blade of your foot can follow the space around each hexagon. (Thus you have 1.5mm on each hexagon). This secures yours hexagon pieces to your background fabric.
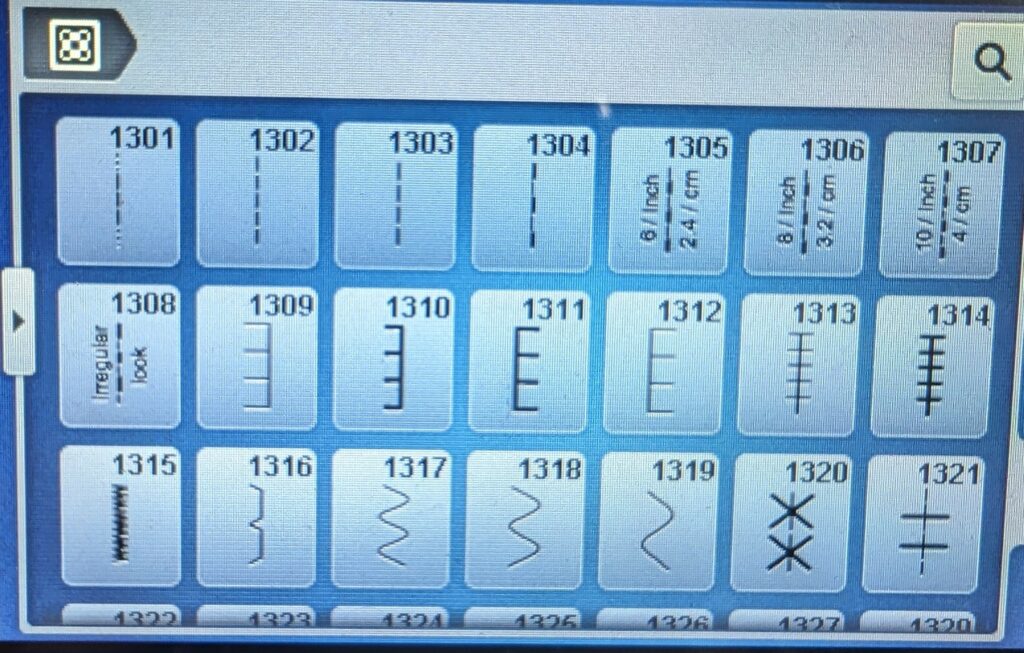
Note, if you choose the Raw edge method, then it may be better to increase the width of your zigzag to 4mm or 5mm. Also you can use a blacket stitch or double blanket stitch for this method (Blanket Stitch1309 and Double Blanket Stitch 1313, This stitches my be differrent on your machine). By choosing Turned edge, then may want to decrease your stitch width for a more invisible stitch.
Statin Stitching
Choosing a tapered statin stitch was a difficult choice. Wanting to make the design look more like a flower bloom and each heagon as a single petal. Adding two (2) layers of tear away stablizer. Also used used a tapered 4mm statin stitch, using Amann Mettler Saba 80 weight, corespun polyester thread.
Well this was a interesting block and first step in creating the Billie Sampler. Loved the choosen method in theory. However, time and end results where not exactly what was intended. Will I redo the block no! Will I choose this method again NO!
I have used this method all my life. Many wonderful quilt designers use this simple method. You do not need line by line instructions. You just need to see or find the underlying grid in the quilt block design. With this method you can also easily alter size of each complete block by simple changing the underlying sub blocks or squares in the grid. This makes the math easy. Remember Quilting is Repeat Repeat and Repeat again. This method also allows you to decide what size sub blocks or squares you prefer. Many love 2 inch finished blocks I actually prefer 3 inch finished blocks. The quilters I if follow and typically get inspiration usually work with 1 inch sub blocks or squares. But the sky is the limit
When we draft or use a pre-drafted quilt block design. The size stated is always finished size of the complete block. So you must always add another ½” to each block and or sub blocks to account for seam allowance (assuming the standard ¼ inch seam allowance used in quilt patchwork).
Categories
Let me take a moment to explain the Grid systems that is used in drafting a quilt design. Most geometric quilt designs used in patchwork fall into a few categories. These categories are essentially squares divided into smaller squares. These smaller squares form a grid of 4, 6, 9, 16, 25, 36, 49 and 64 smaller squares. These Grids usually work in multiple simple Four Patch (4, 16, 36, and 64 smaller squares) and the Nine Patch (9, 36 smaller squares). But we can also have a combination which uses 25 and 49 squares. These are just the most common. But a patchwork block can be made of any number of smaller blocks, and they do not have to be square. You can also make rectangle block.
Note: ther e is another group of blocks, which will be covered in a separate post, that are not based on squares. These blocks are based on lines radiating from the center of the block in equal distances to the edge of the square. This is the foundation of an eight-pointed star grid.
Drafting
The secret to drafting a pattern is to recognize which grid your designs align. And secondly getting the grid to fit the desired finished block size. Lines of the grid in a design are not always visible. And many grid based designs have no squares at all in the design. You must superimpose a grid over the design in your mind.
Your ability to recognize these categories for designs I share is easier since the designs have the grid overlaid onto the block design. Even though the grid is overlaid many may find it difficult to draft the design. You can simply print several copies of your proposed design and then draw the grid lines until you find one that easily overlays or works with the design.
The grids are grouped into 4 separate categories. A design with a grid based on 4, 16, 64 are based on smaller four patch units. Those with 9 and 36 squares are based on Nine Patch units. (however, 36 squares can also be broken into 4 patch units, use which works best for you). The block design based on 25 smaller squares is based on 5 patch units and 49 smaller squares are based on the 7 Patch unit.
Creating the Grids
The first step is to decide the finished block size you desire. However, if your finished blocks size is not flexible, then you may be required to use odd size smaller blocks. Example using a 9-patch based design. If you want a 5-inch finished design, you will need to use 1 2/3 inch finished smaller blocks then need to add ½ for your seam allowance. See how complicated math can get. However, if you changed your block size to 6 inches finished you will need to have 2 inch finished smaller blocks which will make your smaller or sub cuts at 2 ½ inches. Which is significantly easier math. This is how I make my math easier.
4 Patch Grids
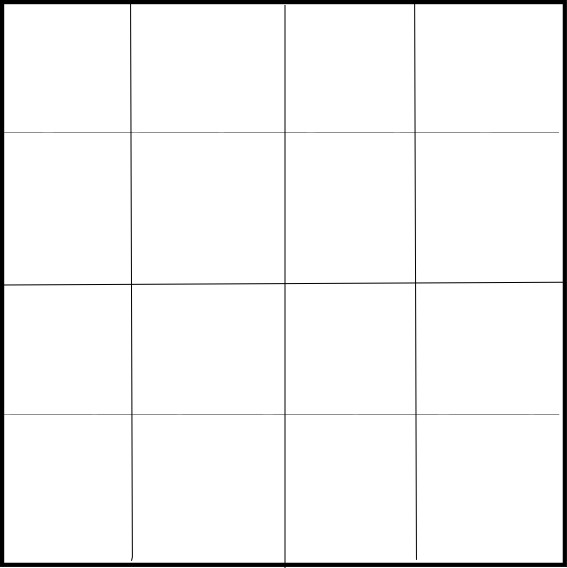
4 Squares
16 Squares
64 Squares
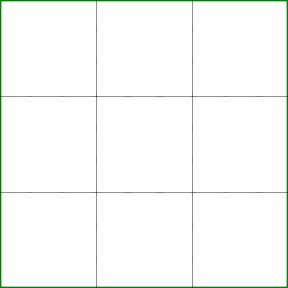
9 Patch Grids
9 Squares
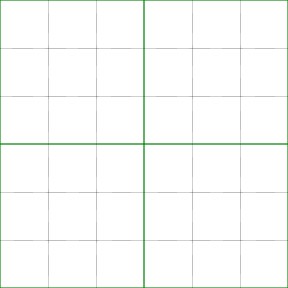
36 Squares
5 Patch Grid
25 Squares
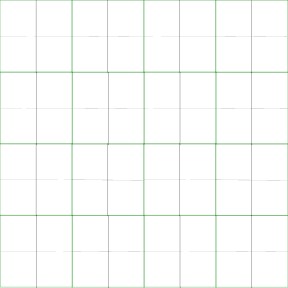
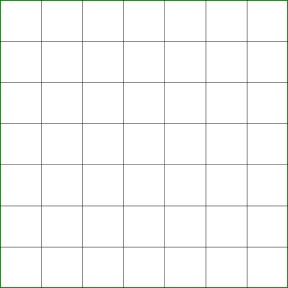
7 Patch Grid
49 Squares
Now that you understand how to divided your block design into different grids, The math becomes easier. I personally work with individual square size and not worry about the finished size of my block.
So using 3 inch finished squares, remember you have to add ½ inch for seam allowance. So you would actually have to cut 3 ½ inch squares. But the math is much easier. Using the 4 patch design, the finished bock would be 2 x 3 = 6 inches. Or 6×6 inch finished block. Using the 16 patch grid, then you would have 4 x 3 = 12 inches, therefore, you would end up with a 12 inch finished block.
Even with the more difficult blocks like the 49 patch block or 7 patch grid, you would get 7 x 3 = 21. So you would complete a 21 inch square block finished.
This method makes math so simple you just need to worry about the induvial size of each block in the grid and then complete the grid. So the math becomes easy. However the smaller your individual sub blocks in the grid the more difficult and precise the stitching needs to be like if you use the 7 Patch grid and want a 7 inch finished block you would need 1 inch finished sub blocks. So always add your ½ inch seam allowance so all your cuts would need to be 1 ½ inches.
Ending Thoughts
The reason I love using 3 inch finished sub blocks or squares, is working with 9 patches, usually my preferred block style. You have options. So if you work with 3 inch the math becomes easier. Like if you want to add dimension to your block, using a 3 inch sub patches in your nine patch which give you a 9 inch finished block. But you can also easily add a nine patch into one of your 3 inch Sub patches or squares which gives you a nine patch in a nine patch. You just need 1 inch finished sub blocks. The match is 3 / 3 = 1 so easy math
Now you can see the endless possibilities. Each week on Friday I post a little quote and a block made from one of these grids. You are welcome to use any of these blocks. They are old vintage blocks with no copyright. So have fun.
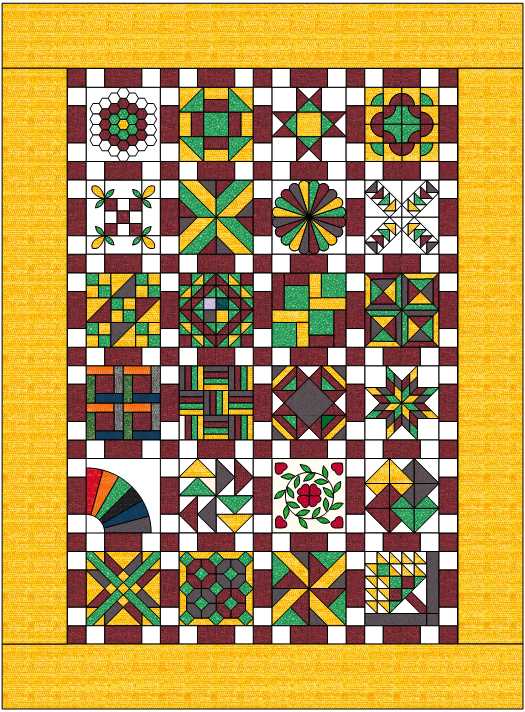
Billie’s Sampler is a 24 Block Sampler from Great American Quilts of 1989 by Sandra L. O’Brien from Oxmoor House.
The blocks are 12×12 inch Finished with a 3 inch wide pieced sashing. The finished side borders are 10 1/2 inch finsihed and the top borders are 7 inches finished. Total finished size is 84×114 inches.
Each block is vintage blocks which carry no copyright. I personally have redrafted the blocks in Electric Quilt 8. Billie Samper Electric Quilt Project File (zip file)
Blogging my journey in recreating this quilt project, I will post 2 blocks per month along with video explaining how and why I choose the process.
Fabric Estimate
Background (white) 3 yards/meters, Color 1 (Yellow) 4 yards/meters, Color 2 (Red) 2 1/2 yards/meters, Color 3 (Green) 2 yards/meters, Color 4 (Grey/Blue) 1 1/2 yard/meter
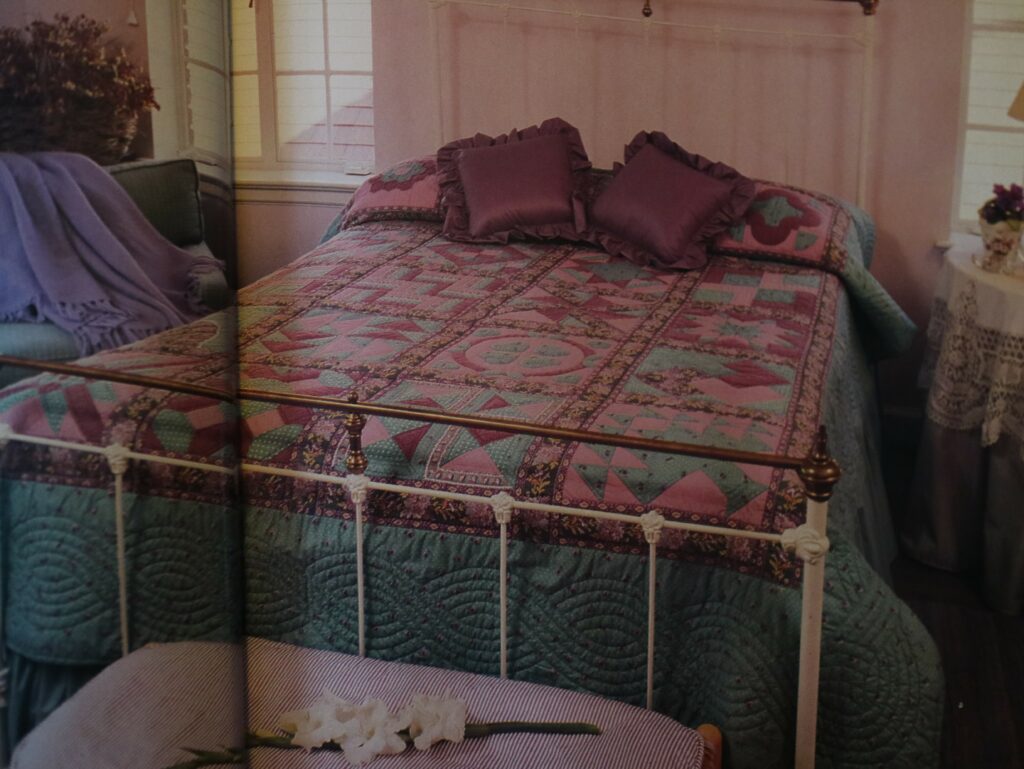
History of Billie’s Sampler
You can almost smell the aroma of budding springtime with looking at Billie’s Sampler quilt./ The floral stripped sashing and small-flowerd prints in warm shades of lilac and green evode a garden rady to burst into bloom. The quilt is a reminder, too, that tradtional blocks lend themselves very well to non traditonal colors.