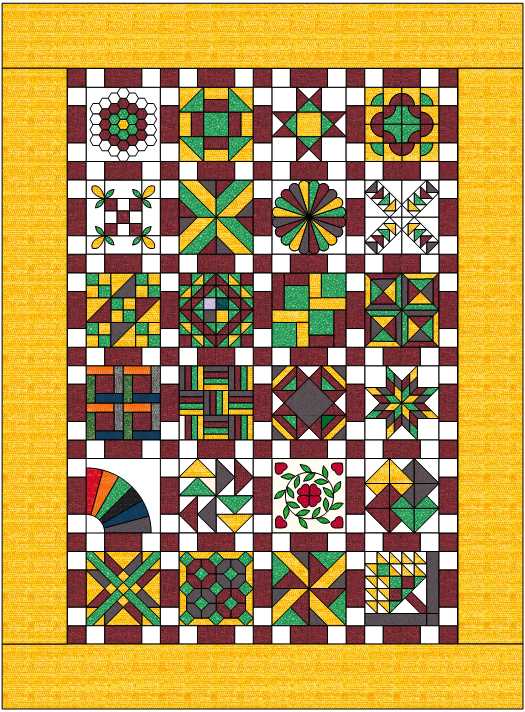
Well the 24 blocks of the sampler is completed. This was interesting sampler
Many of the Blocks were Paper Pieced for simplicity and accuracy. Also many of the blocks were designed to be hand pieced. By machine piecing many of the techniques had to be adapted. There were lots of Partial Seams, Y Seams These techniques are almost impossible using a machine
Like the 45 degree diamonds it is easy to nudge a diamond into position. But using a sewing machine it is impossible to nudge.
So we have learned many new ways of making our blocks. And adapting to changing time.
I have put this project away, into my UFO pile. I lost interest and failed. But I look forward to seeing how you choose to complete the project.
I personally learned I like paper piecing and also have developed a thing for triangles Half and Quarter Square Triangles.
The Blocks
Below is a link to each of the 24 individual blocks.
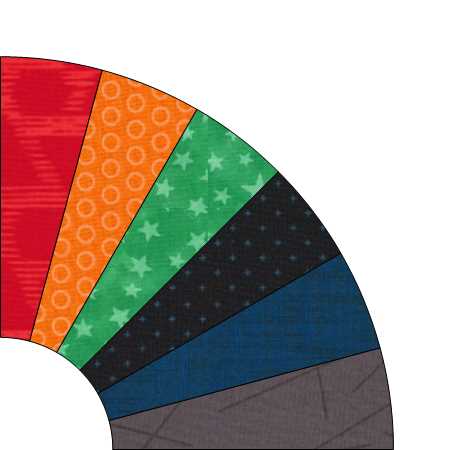
I cut my 6 blades using the templates in the PDF. Using seam align glue secure the templates to your fabric. I used scraps from previous blocks.
I assembled my blades one at time. wanting to keep my color order correct and for accuracy. using seam align glue again with pins align each of your blades in the proper order. The stitching line on the template helps with accuracy.
after assembling all 6 blades. and pressing properly.
wanting a smooth edge, I decided to turn my edges. Using a piece of waster soluble mesh stabilizer. laying on top and stitching a 1/4 seam on the stop and bottom curve of the fan.
Trim excessive stabilizer away
because both sides are left open. Turning was no issue. it was fast and easy.
using low heat on your iron press your fan smooth. Be careful that your iron is not too hot as it can melt the stabilizer on the back. Because you used water soluble you do not need to remove the stabilizer. This gives you are good clean perfect edge to applique your fan to the background square.
I used my Elmer’s Purple glue stick to secure my fan to the background. it is easy to align just align so that the two sides are even with the edges of the 12 1/2 inch background square.
I used a special applique stitch. A modified blanket stitch. which is 0,8 mm wide by 1.0 mm length with a Balance adjusted to +20 This makes the blanket stitch look very similar to a blind hem but with only one stitch forward. Also this allows me to use my straight stitch 1/4″ foot and plate on my sewing machine. (Note I use a Bernina) This method also worked on my Pfaff but had to use my 9mm stitch plate because the machine automatically recognized my stitch plate
I also had a Janome. I could not just adjust the stitch like the Bernina and Pfaff as my Janome didn’t have balance setting for the stitches. However I could make the stitch in the Horizon Link Stitch Composer. (Note: my Janome was a Horizon Memory Craft 12000)