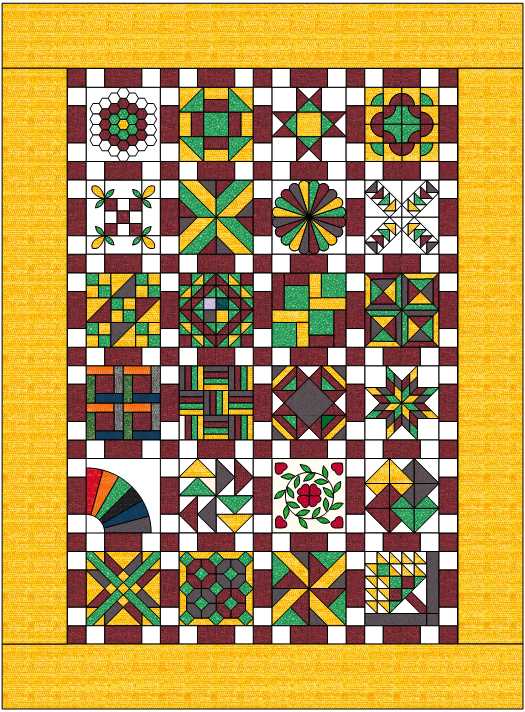
Well the 24 blocks of the sampler is completed. This was interesting sampler
Many of the Blocks were Paper Pieced for simplicity and accuracy. Also many of the blocks were designed to be hand pieced. By machine piecing many of the techniques had to be adapted. There were lots of Partial Seams, Y Seams These techniques are almost impossible using a machine
Like the 45 degree diamonds it is easy to nudge a diamond into position. But using a sewing machine it is impossible to nudge.
So we have learned many new ways of making our blocks. And adapting to changing time.
I have put this project away, into my UFO pile. I lost interest and failed. But I look forward to seeing how you choose to complete the project.
I personally learned I like paper piecing and also have developed a thing for triangles Half and Quarter Square Triangles.
The Blocks
Below is a link to each of the 24 individual blocks.
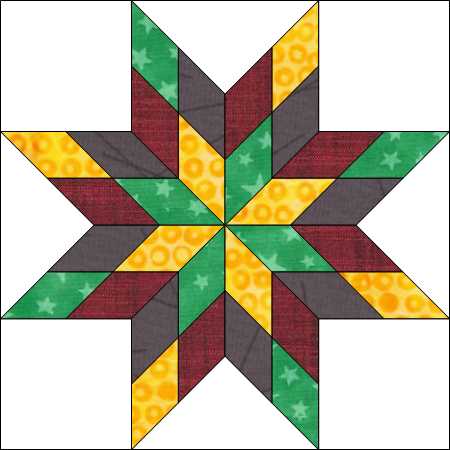
I always knew this block as Blazing Star. There are many names some would call it a mini Lone Star etc. But the book says it is a Morning Star, so that is what we will use.
Cutting
36 x 2 1/2 x 1 3/4 inch 45 degree diamonds. This is 8 diamonds of each of your chosen 4 colors If you choose 3 colors then one color you will need 16 diamonds.
4 x 4 x4 inch squares for the corners of this block using your background fabric.
1 x 6 3/16 x 6 3/16 I cut my square at 6 1/2 x 6 1/2 and trimmed after stitching into the block. However cut your large square into quarter square triangles (QSTs). there should be 4 equal triangles.
I was going to piece my block the old fashioned way, like you would assemble if you were hand piecing. This didn’t work. Also had major issues cutting accurate 45 degree diamonds. So I eventual broke down and paper pieced this block. There are many little nuances and notes about paper piecing all these diamonds. I will explain as the block develops.
I originally cut my 45 degree diamonds using the markings on my cutting mat. eventually realized the diamonds were 45 degrees but not the correct size
Using seam align glue. I stitched my center diamonds in pairs to create a 8 pointed star, or Lamoyne Star.
Again using seam align glue I stitched the 4 pairs into a set of 2 pairs with 4 diamonds each.
Then I stitched the 2 half’s into a single 8 pointed star block.
When I tried to add the next row of 45 degree diamonds, using Y seams This failed miserably with the sewing machine. I either had a hole at the intersection or a pucker. This would have been so easy nudging and smashing if using a needle and thread and your hands. So I broke down and decided to just paper piece.
now when I started looking at my diamonds i really noticed how off they were compared to the paper piecing shapes. But lucky each diamond was too large and worked with paper piecing so I didn’t have to recut my diamonds.
with all your colors diamonds laid out you are ready to start paper piecing.
The paper piecing units are in sub blocks of 2 diamonds. Take notice that these blocks are directional and need to take extra caution in the direction you assemble your color diamonds and there is a top and bottom of each sub block.
now that stitching each of the sub blocks into the next level sub block of 4 diamonds making a larger diamond. the assembly is simple like i showed originally. stitch in pairs and then stitch again in pairs and then stitch the 2 half together.
The notice is how the seam lines and colors interact to keep them all going the correct direction I warn that you must take caution when assembling the sub blocks. I had to remove several of my diamonds to put them in the correct arrangement so the colors and seams all align properly.
You star is complete. Now we must add the background squares and QSTs to finish the block off
I marked each point in the block with a pencil showing where the 1/4″ seam was. Also marking 1/4″ on the background squares and triangles so the points can be accurately matched. As you must use Y and partial seams for this step . Also the seams must end exactly at the 1/4″ mark or you get a pucker. if the seam is too short then you get a hole.
after marking the 1/4′ mark in the points using seam align glue I added my corners and middle triangles.
The photo of the finished block is before I trimmed. You will notice the extra fabric in the middle triangles where I cut my large square a little to larger before making into QSTs. and you can also notice some of the pencil marks added so that my seams were accurate. I use true graphite #2 pencils The graphite will brush off and will definitely wash out. Be cautious many modern pencils use polymers mixed with the graphite. These polymers are difficult to remove. So I avoid them.